Introduction
The ‘<button>‘ element used to create clickable buttons on a web page. It is part of the HTML forms and is commonly used in conjunction with JavaScript to create interactive user interfaces. The ‘<button>‘ element can contain text, images, or other HTML elements, and it can trigger actions or events when clicked.
Here’s a basic example of a <button> element:
<!DOCTYPE html>
<html lang="en">
<head>
    <meta charset="UTF-8">
    <meta name="viewport" content="width=device-width, initial-scale=1.0">
    <title>Document</title>
</head>
<body>
    <button>Click me</button>
</body>
</html>
Output :

Buttons can also be styled using CSS to enhance their appearance and match the overall design of a webpage.
Uses of <button> tag :
The ‘<button>‘ element is a versatile element that can be used for various purposes on a web page. Here are some common uses of the ‘<button>‘ element:
1. Form Submission : Used as a submit button within HTML forms to submit form data to a server.
Syntax : ‘<button type=”submit”>‘.
Example :
<!DOCTYPE html>
<html lang="en">
<head>
    <meta charset="UTF-8">
    <meta name="viewport" content="width=device-width, initial-scale=1.0">
    <title>Form Submission Example</title>
</head>
<body>
    <form action="/submit" method="post">
        <!-- Your form fields go here -->
        <label for="username">Username:</label>
        <input type="text" id="username" name="username" required>
        <br>
        <label for="password">Password:</label>
        <input type="password" id="password" name="password" required>
        <br>
        <!-- Submit button -->
        <button type="submit">Submit</button>
    </form>
</body>
</html>
Output :

2. Form Reset : Used as a reset button within HTML forms to reset the form fields to their initial values.
Syntax : ‘<button type=”reset”>‘.
Example :
<!DOCTYPE html>
<html lang="en">
<head>
    <meta charset="UTF-8">
    <meta name="viewport" content="width=device-width, initial-scale=1.0">
    <title>Form Reset Example</title>
</head>
<body>
    <form action="/reset" method="post" id="myForm">
        <!-- Your form fields go here -->
        <label for="username">Username:</label>
        <input type="text" id="username" name="username" required>
        <br>
        <label for="password">Password:</label>
        <input type="password" id="password" name="password" required>
        <br>
        <!-- Reset button -->
        <button type="reset">Reset</button>
    </form>
</body>
</html>
Output :

3. Custom JavaScript Actions : Used to create buttons that trigger custom JavaScript functions or actions without submitting a form.
Syntax : ‘<button type=”button”>‘.
Example :
<!DOCTYPE html>
<html lang="en">
<head>
    <meta charset="UTF-8">
    <meta name="viewport" content="width=device-width, initial-scale=1.0">
    <title>Custom JavaScript Action Example</title>
</head>
<body>
    <!-- Your button with custom JavaScript action -->
    <button type="button" onclick="myCustomFunction()">Click me</button>
    <script>
        // Define a JavaScript function to be called when the button is clicked
        function myCustomFunction() {
            alert("Button clicked! This is a custom JavaScript action.");
            // You can perform additional actions here
        }
    </script>
</body>
</html>
Output :

When we click on the button alert message is given.

4. Navigation : ‘<button>‘ elements can be used to create navigation buttons that take users to different pages or sections of a website.
Example :
<!DOCTYPE html>
<html lang="en">
<head>
    <meta charset="UTF-8">
    <meta name="viewport" content="width=device-width, initial-scale=1.0">
    <title>Navigation Button Example</title>
</head>
<body>
    <!-- Your navigation button -->
    <button type="button" onclick="navigateToHome()">Go to Home</button>
    <script>
        // Define a JavaScript function for navigation
        function navigateToHome() {
            // Replace the URL with the desired destination
            window.location.href = '/home';
        }
    </script>
</body>
</html>
Output :

And when we click on the button we go to home page of the website.
5. Modal Windows/Dialogs : ‘<button>‘ elements are often used to trigger the display of modal windows or dialogs.
Example :
<!DOCTYPE html>
<html lang="en">
<head>
<meta charset="UTF-8">
<meta name="viewport" content="width=device-width, initial-scale=1.0">
<title>Modal Window Example</title>
<style>
/* Style for the modal */
#myModal {
display: none;
position: fixed;
z-index: 1;
left: 0;
top: 0;
width: 100%;
height: 100%;
overflow: auto;
background-color: rgba(0, 0, 0, 0.5);
}
/* Style for the modal content */
.modal-content {
position: relative;
margin: 15% auto;
padding: 20px;
width: 50%;
background-color: #fff;
border-radius: 5px;
}
</style>
</head>
<body>
<!-- Button to open the modal -->
<button type="button" onclick="openModal()">Open Modal</button>
<!-- The Modal -->
<div id="myModal" class="modal">
<!-- Modal content -->
<div class="modal-content">
<span onclick="closeModal()" class="close">×</span>
<p>This is a modal window. Click the 'x' to close it.</p>
</div>
</div>
<script>
// Function to display the modal
function openModal() {
document.getElementById('myModal').style.display = 'block';
}
// Function to close the modal
function closeModal() {
document.getElementById('myModal').style.display = 'none';
}
// Close the modal if the user clicks outside of it
window.onclick = function(event) {
var modal = document.getElementById('myModal');
if (event.target == modal) {
closeModal();
}
};
</script>
</body>
</html>
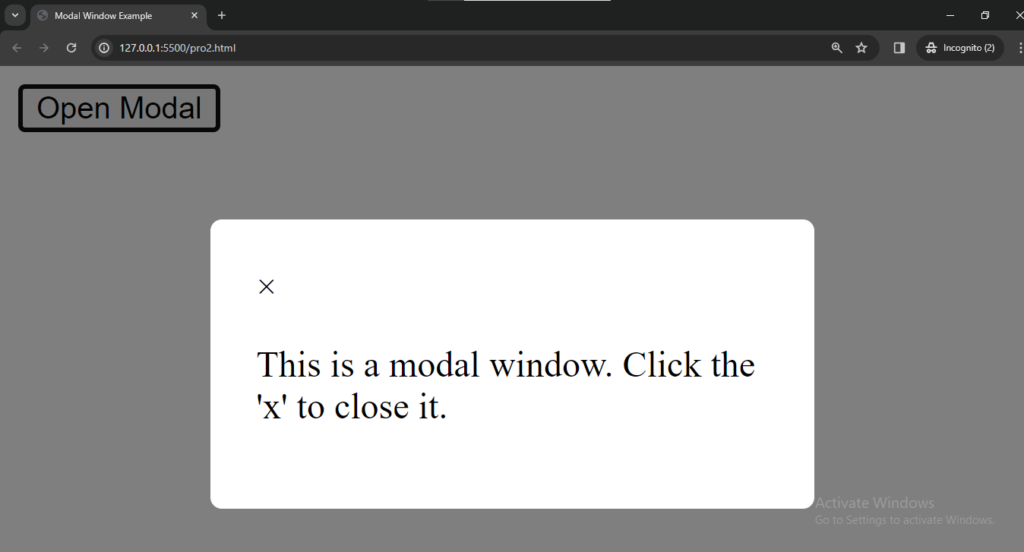
Output :

And when we click on the button a modal window is open. and when we click on the ‘x‘ modal window is close.

And when we click on the ‘x‘ modal window is close.
6. Toggle Buttons :<button> elements can be used to create toggle buttons that switch between different states.
Example:
<!DOCTYPE html>
<html lang="en">
<head>
    <meta charset="UTF-8">
    <meta name="viewport" content="width=device-width, initial-scale=1.0">
    <title>Toggle Button Example</title>
    <style>
        /* Style for the active state */
        .active {
            background-color: green;
            color: white;
        }
    </style>
</head>
<body>
    <!-- Toggle Button -->
    <button type="button" id="toggleButton" onclick="toggleState()">Toggle</button>
    <script>
        // Function to toggle the state
        function toggleState() {
            var button = document.getElementById('toggleButton');
            button.classList.toggle('active');

            // You can perform additional actions based on the state
            if (button.classList.contains('active')) {
                // State is active
                console.log('Button is active');
            } else {
                // State is inactive
                console.log('Button is inactive');
            }
        }
    </script>
</body>
</html>
Output :

And when we click on the toggle button it will change.

7. Interactive Features : Used to create interactive features on a webpage, such as interactive quizzes, games, or any functionality that requires user interaction.
Example :
<!DOCTYPE html>
<html lang="en">
<head>
    <meta charset="UTF-8">
    <meta name="viewport" content="width=device-width, initial-scale=1.0">
    <title>Interactive Button Example</title>
</head>
<body>
    <!-- Interactive Button -->
    <button type="button" id="interactiveButton" onclick="handleClick()">Click me</button>
    <script>
        // Function to handle button click
        function handleClick() {
            var button = document.getElementById('interactiveButton');
            // Toggle background color on each click
            button.style.backgroundColor = (button.style.backgroundColor === 'blue') ? 'green' : 'blue';
            // Display a message in the console
            console.log('Button clicked!');
        }
    </script>
</body>
</html>
Output :

And when we click on the button it will change the color.

and

8. Styling and UI Design : ‘<button>‘ elements can be styled using CSS to enhance their appearance and match the overall design of the website.
Example :
<!DOCTYPE html>
<html lang="en">
<head>
    <meta charset="UTF-8">
    <meta name="viewport" content="width=device-width, initial-scale=1.0">
    <title>Document</title>
    <style>
        button{
            background-color: hotpink;
            color: blueviolet;
        }
    </style>
</head>
<body>
    <button>Click Button</button>
</body>
</html>
Output :

